It is not as easy as it seems and the manual is very light on the actual steps one has to go through in order to set the N2 up so you can work split. Luckily for me I had Perrin down in Aussi to help me through the steps and get it working. Thanks again Pez!
It is a two stage process. First step is to set up the amount of split required and this is performed in the user Menu under Item 15 labelled TXREP. There are 5 digits that come up and the default will read 01000 which equates to 100khz. That might be a bit much as most Split DX will not be operating that far away from their Listening frequency. To change the offset in the menu, repeated quick presses of the VFO will cycle through the 5 digits in order. Turning the VFO while a digit is blinking will change that value. 00500 will equate to 50khz and 00100 will equate to 10khz.
That completes Step One.
Step Two begins with a Press and Hold of the FRQ/REP button above the mic connector. Then a short press of the VFO will bring up the shift options and you rotate through; off/+/- . This enables you to turn on the shift function and choose if it is to shift up or down. Important Note: Every time you turn on the shift function you must cycle through the options and stop at the one you want. You can’t turn on the shift function if you don’t depress the VFO and choose the option. A further quick press locks it in. In use it is always your TX frequency that will change according to the split and direction you have chosen.
It is a little fiddly till you get the swing of it, but if you are working a DX station on split it can be done on the AT-5555N2 It took me a while to get it right because I was holding in the VFO too long. Short presses, not long holds.
Hope this helps
I may add some photos when I get time if anyone is having trouble following the steps above.
Reports are coming in of noisy receive and S7 S meter readings with no signal on newer Anytone AT-5555N2’s and several of the derivatives. It is certainly real. I have it on mine. I have no idea what causes it. Is it a design change, a component issue or a software issue. Fingers crossed it is software and an easy fix. The N2 does have software to install frequencies but I do not know if the same cable with different software can be used for updating the firmware or Service Menu settings in these radios. If it is possible, Anytone are keeping very quiet about it. So far as we are presently aware any changes to the radio’s working parameters must be made through accessing the Service Menu and adjusting things physically by manipulating the radio controls. But I am sure it is not the way Anytone do it in the factory. There would have to be a program in order to achieve this quickly and acurately.
If the Noise and the S meter reading are pissing you off and you would like to do something about it, here is a work around that you may want to try which involves changing the service menu value for RF GAIN. Its just a work around. It does not fix the problem completely, but might make it easier to live with.
As long as you don’t change anything else, you won’t screw up the radio. I have no idea if the Anytone AT-5555N2 service menu is the same as in the CRT7900V and new strykker 955 but it is RFG you are after. The N2 has 59 settings in the service menu. You could really screw up a radio if you went nuts in the service menu. Its your fault if you fuck things up.
Here is how to access the Service Menu
Step 1 : Press and Hold Menu and Mode while you turn on the radio. All LCD segments will show for about 2 seconds.
Step 2 : Within this 2 second window release the Menu and Mode buttons and immediately press (one after the other in order) RB, NB, SCAN, MEM, EMG
The radio will enter the Service Mode.
The setting you are after is CH-52 RFG
To check the value for any menu just key the mic.
The default for RFG seems to be around 86 for all brands.
Take a note of what your setting for CH-52 is before you do anything further.
To alter the value press and hold the PTT while rotating the VFO up or down.
I set the RFG on my N2 to 105. Up from 86. Turn the radio off and the radio will turn on with the new value.
Reduce the RF gain about 10% and the noise should clear up and the volume will need to be increased to compensate but it will make listening much nicer. The RF gain is reduced and the S meter will not read as high. Turn the RF gain up and suddenly the noise will be back along with a big increase in signal. Just like turning on an rx preamp.
I wouldn’t call it a fix by any means but is is a work around for the time being and might be appreciated by some users.
I have one of each to test and will be spending some time with each to see what I think of them. Despite sharing the same main board they are completely different animals in the flesh. The AT-5555 Plus/N is very similar (almost identical really) to the older versions of the AT-5555 which we first looked at many years ago and was continually refined and improved over the following years. I think version 6 was the last one and it seemed to be pretty good. You can order the AT-5555 Plus radios with or without the noise reduction but I think the N II has it built in. I will be adding to this post over the next few days as I become more familiar with the radios.
So for now I will just go through the new AT5555 Plus /N. Plus N means it has the noise reduction features installed. It actually has 2 receive noise reduction settings, neither of which are adjustable: ON or Off from the menu which is accessed by holding down the func button for 2 seconds. They are the compander under item 06 nC and the Noise Reduction nR under Item 08 in the menu settings. There are 25 settings in the radio’s software settings. The most important is the mic gain! It comes in as item 01…Out of the box it was set at 31 out of 63 and I cranked mine up to 60 just because that is where I used to have it set on the other anytones. Other than that there is not a lot to play with in the menu.
NOISE REDUCTION The menu on the AT-5555N II only has one noise cancelling feature. NR but it is adjustable. My initial impression of the noise reduction on the AT-5555 Plus/N is that it is too aggresive. Some background artifacts almost like FM broadcast bleed thru, but we don’t have any FM transmitters nearby. Need to play with it some more, but it ressembles setting 5 on the N II and tends to distort the received audio. It also takes a few miliseconds to start working which is a bit frustrating. The other thing with the noise reduction is that you have to go into the menu to activate and deactivate it. This is a pain. You need it on a button and you need it adjustable. Adjust it in the menu and activate it on a switch. The AT-5555 Plus has 8 switches with 15 functions…surely 2 of those could be repurposed? Better still: put the echo controls into memory and put the NR and NC on the echo knobs so it could be readily adjustable. NC? So far it just seems to make more noise. Not much, but certainly doesn’t reduce it on Sideband. Another thing I noticed on this radio and not on the earlier versions of the AT-5555 that when you are in the menu the channel indicator shows the menu number. Thats handy because sometimes it is tricky to know exactly where you are in the menu. Of course you will need the manual to see what the menu number is associated with. Just found out that you can’t have the Noise compander and the Noise reduction on together. Turning one on will turn the other off! The noise reduction does knock out lots of background noise…sometimes almost all the hash. Still don’t know what the compander is supposed to achieve. Time might tell.
Expanding the frequencies. AT-5555 Plus. You don’t need the program or a cable to get this on to 27mhz. Just hold Func and EMG in and turn on the radio then let the buttons go. It will be in Band 1; rotate the channel selector one click and it will go to Band 2. Press and hold func till it shows Rend on the screen. Turn the radio off. When you turn it on again it will be in the expanded mode and have 6 bands of 40ch from 25.615 through 28.305. If you want to work 10m you will need to reverse the process and revert to band 1. No wire cutting or jumper jumping or programming required. Pretty much the same as the old versions. If you want to go down to 24.715 and have 60 channels per band then you will need the cable and the program and fill out what you need by hand. Laborious because with the AT 5555 you have to fill in both TX and RX frequencies, so twice as much work. This feature is great if you have some repeater offsets or you want to work split but otherwise…..It is what it is!
The program. The program for this radio is the AT-5555 7.01 The others do not work. The original cables probably do. I won’t go into it here but if you only want to work 11m or 10m you probably don’t need to mess around with the program. If you want 60 channels per band or 12m you are going to need it.
Tuning around on the AT-5555 Plus is not as straight forward as on the AT-5555N because you can’t change the selector step. It is set at 10khz steps and that is that. Now having said that it is possible that some of the other makers that rebadge this radio may incorporate different selector steps but the Anytone versions at this stage don’t. If you want to tune about you will have to use the clarifier.
The Clarifier. The clarifier in the AT-5555 Plus has a lot going on. It is not like your normal clarifier. This one works in clicks like the channel selector and takes a while to get used to. You can see the frequency change on the display which is handy. Just don’t worry about which way the knob is pointing, what is important is the offset on the display, and even if the knob is at 90 degrees as long as the display reads 00 at the end you will be on frequency. If it bothers you, turn the radio off and recenter the knob and when you turn the radio on again 00 will be center on the knob too! This clarifier, just like the earlier ones, has a mini menu all its own and I am not going to get into it too deep. RTFM! The bit we want to use to tune away from the selector channel is the Step or STP. If you set it for 1khz, you can click your way up or down in 1khz steps. If this sort of stuff bothers you then you need to buy the AT-5555N II, which has a bit more power, a much easier menu system, a much bigger heat sink and a lot less messing about. It looks like an amateur radio and other than the 40ch bands it works like an amateur radio.
Thats about it for now on the AT-5555 Plus..I have yet to put it on air but I will shortly. Into a dummy load it showed 40w on FM, 12w carrier and 40w PEP on AM and 35w PEP on sideband. At this stage I don’t see any point in trying to squeeze any more out of it. And to be honest..you can’t really because everything is in the service menu. There are no user adjustable components in this radio. They tune these things via computer, which I think should make them more consistant and quicker to tune on the production line. Admittedly, there may be a bit of a learning curve while they get their systems sorted but I am hoping for a better tune out of the box. Forget about paying for a tune up when you buy this radio. Eventually I am sure the contents of the service menu and the adjustments will become common knowledge, but for now: stay out of the service menu. If it doesn’t work to your satisfaction out of the box, return it.
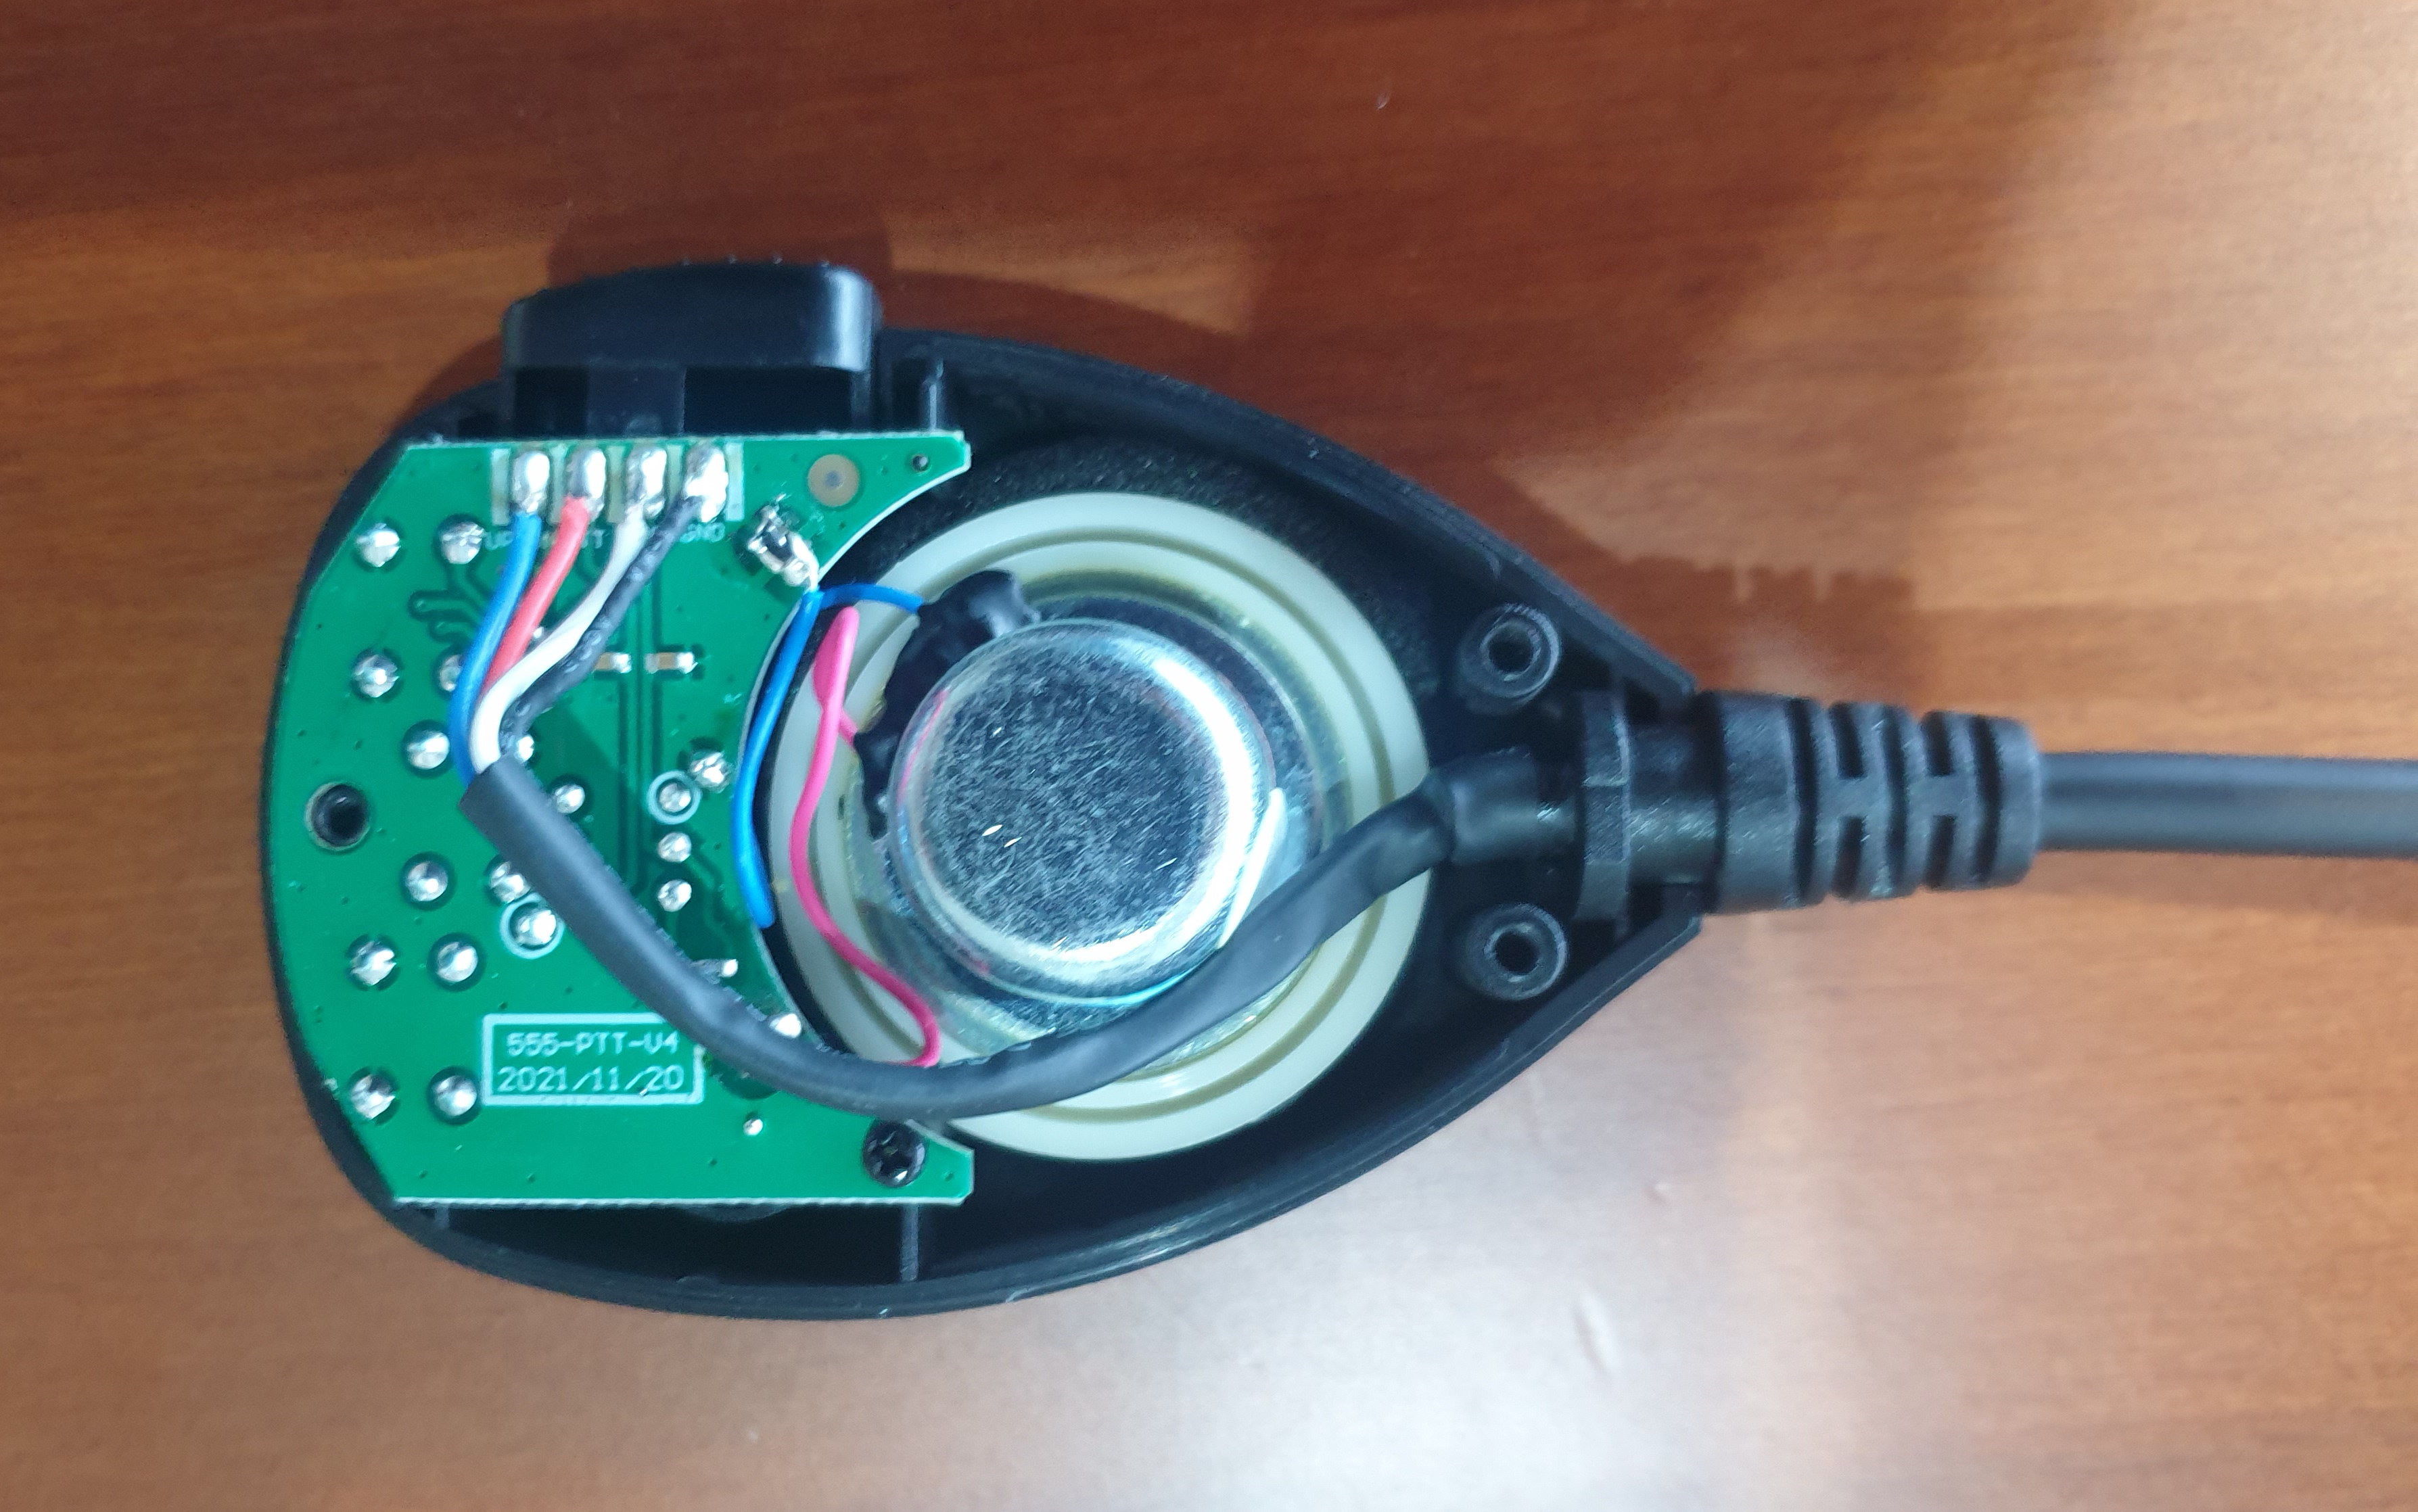
The microphone on this radio is a 4 pin barrel connector with a dynamic insert. This should make it real easy to fit other common dynamic microphones to this set. It does have a setting in the menus for electret type mics which need some voltage to one of the pins but I don’t want to go there at this stage.
More on how it works on air and some photos, after the weekend.
AT-5555 PlusThis new AT-5555 Plus version has vents in the case.Just had to prove to myself it was a dynamic insert
The microphone is the same shape that has always been on the AT-5555 radios since version one. Small and light. There is a bit of room to add some weights but I am sure there are a lot of folks who will want something bigger and heavier.
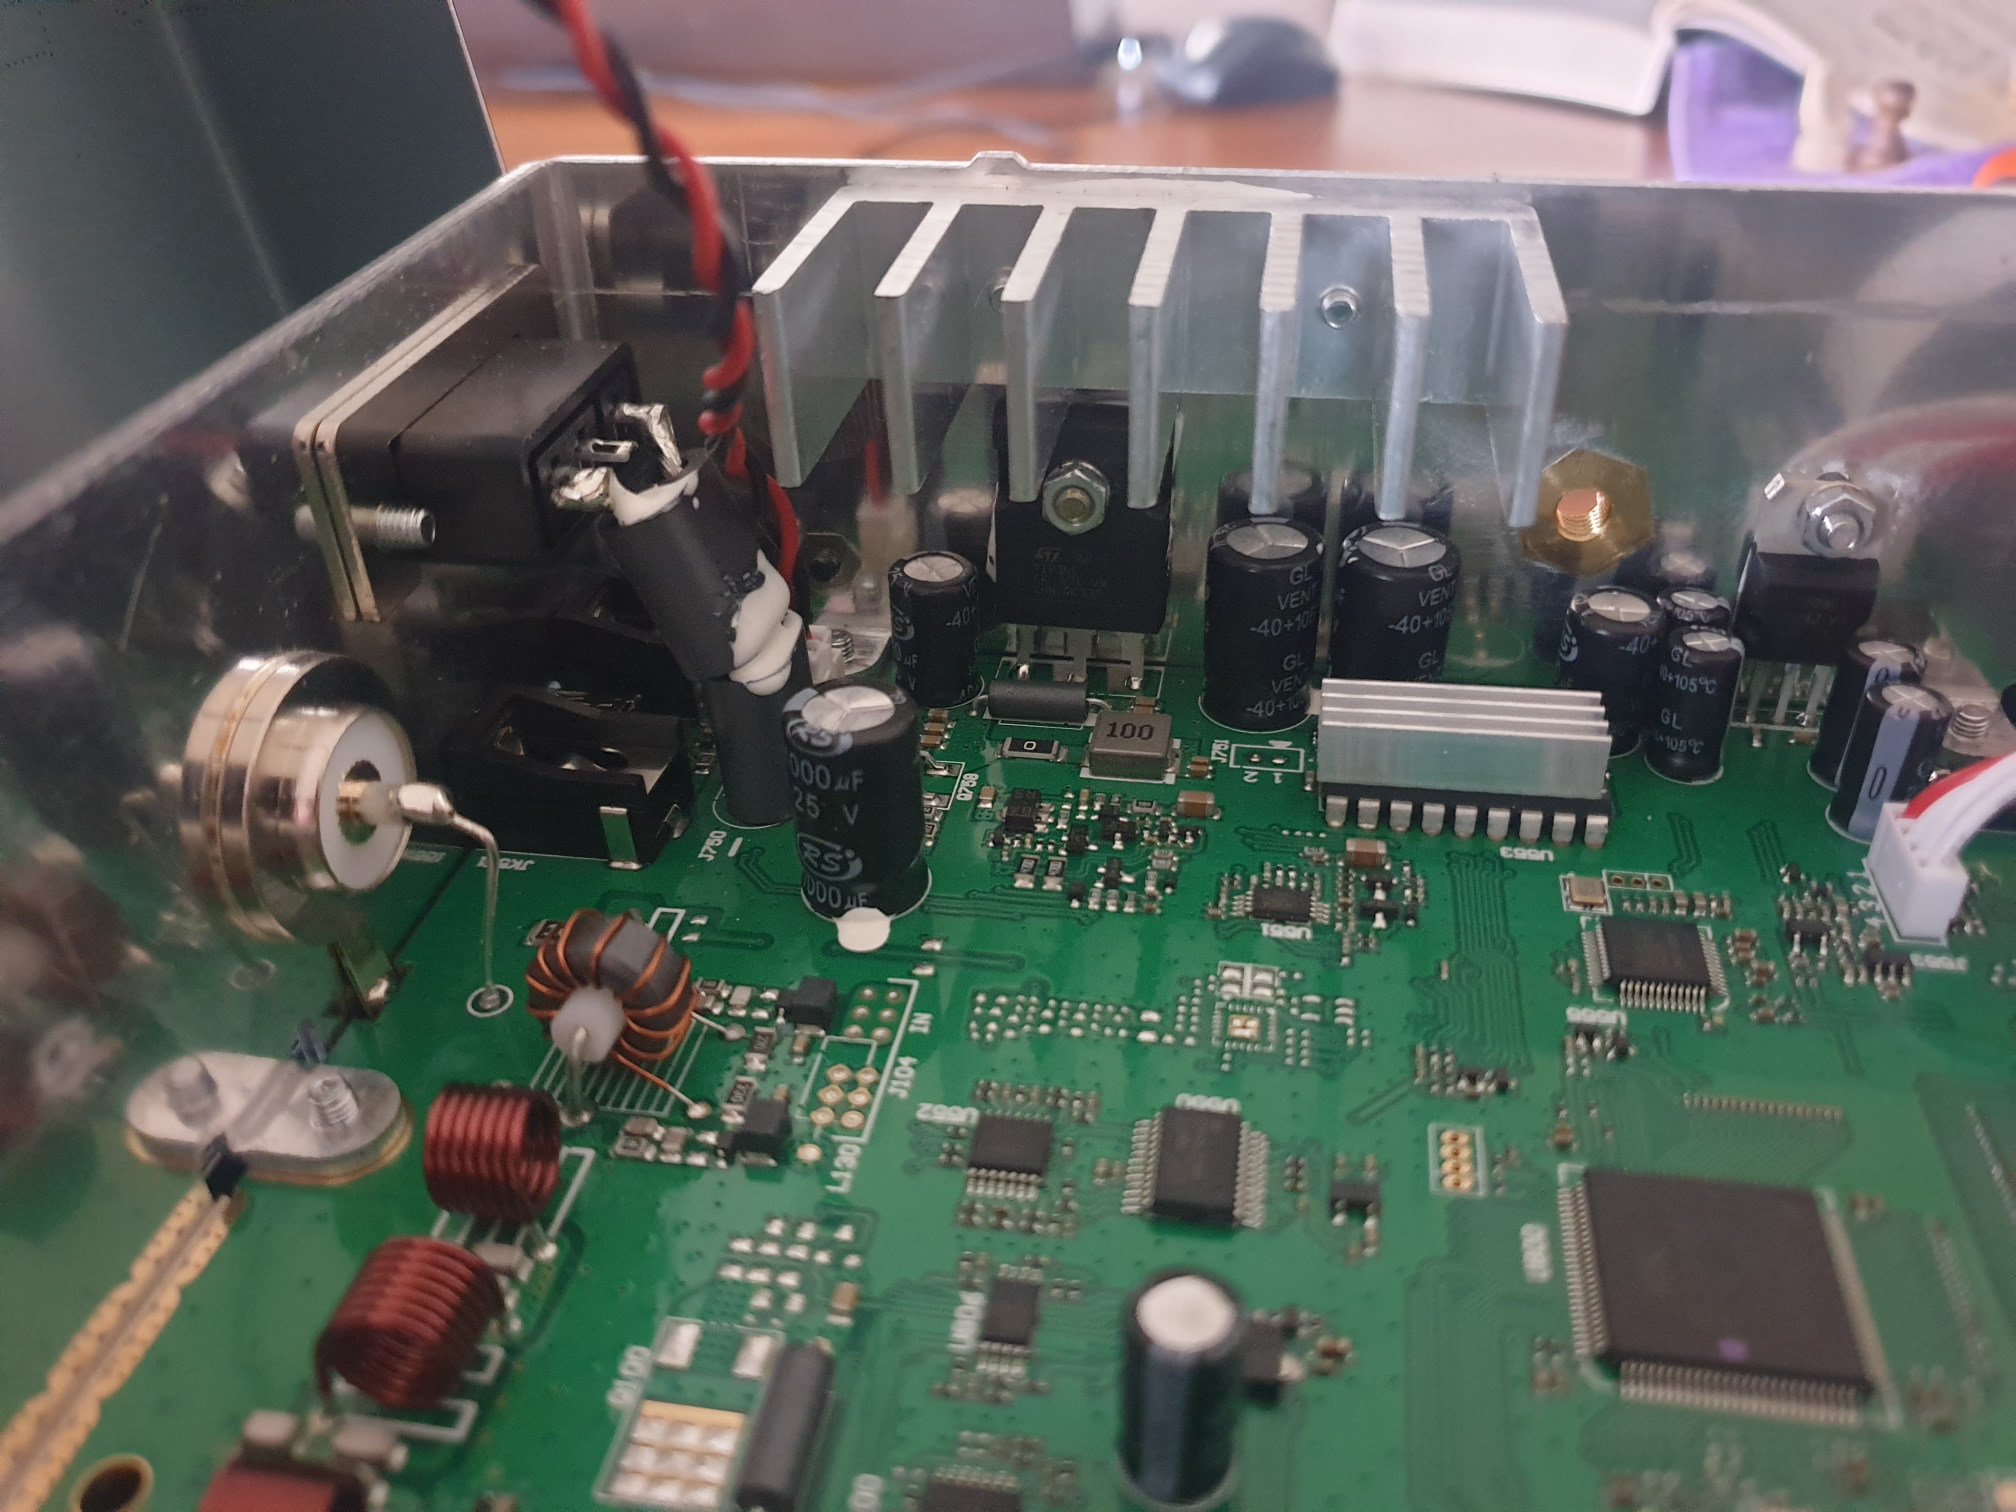
They added a couple of Internal heatsinksThe main board is much smaller now. Nothing to play with here!
The pre driver transistor that the higher power versions have has not been installed on the AT-5555 Plus
The little add on board at the front of this picture is not present on the AT-5555N. Is it the noise compander or something to drive the display of the AT-5555 Plus?
This seemingly add on component is on the underside of mainboard on both radios. Was told it was a protection device. Be interesting to know what it protects, and how, and why!
See…It does go down to 24mhz
Notes on the AT-5555N II It doesn’t take long to realise the AT-5555N II is the radio to get. Not that there is anything wrong with the AT-5555 Plus /N but the N II just does everything better and easier and has more power to boot. For sure the N II will be more expensive. But it will be worth the extra. The knobs are well sized and easy to use in the car. The N II microphone is larger and sturdier than the 5555plus. Out of the box into a dummy load we saw 40w on FM, 17 carrier and 60w Pep on AM, and 60w PEP on the sidebands. The heatsink is well sized and one of the largest I have seen on a 10m radio. The heatsink stayed barely warm after 30 minutes of sideband use at full power. The AT-5555 Plus uses a dynamic microphone and the AT-5555N II uses an electret type similar to the AT-6666.
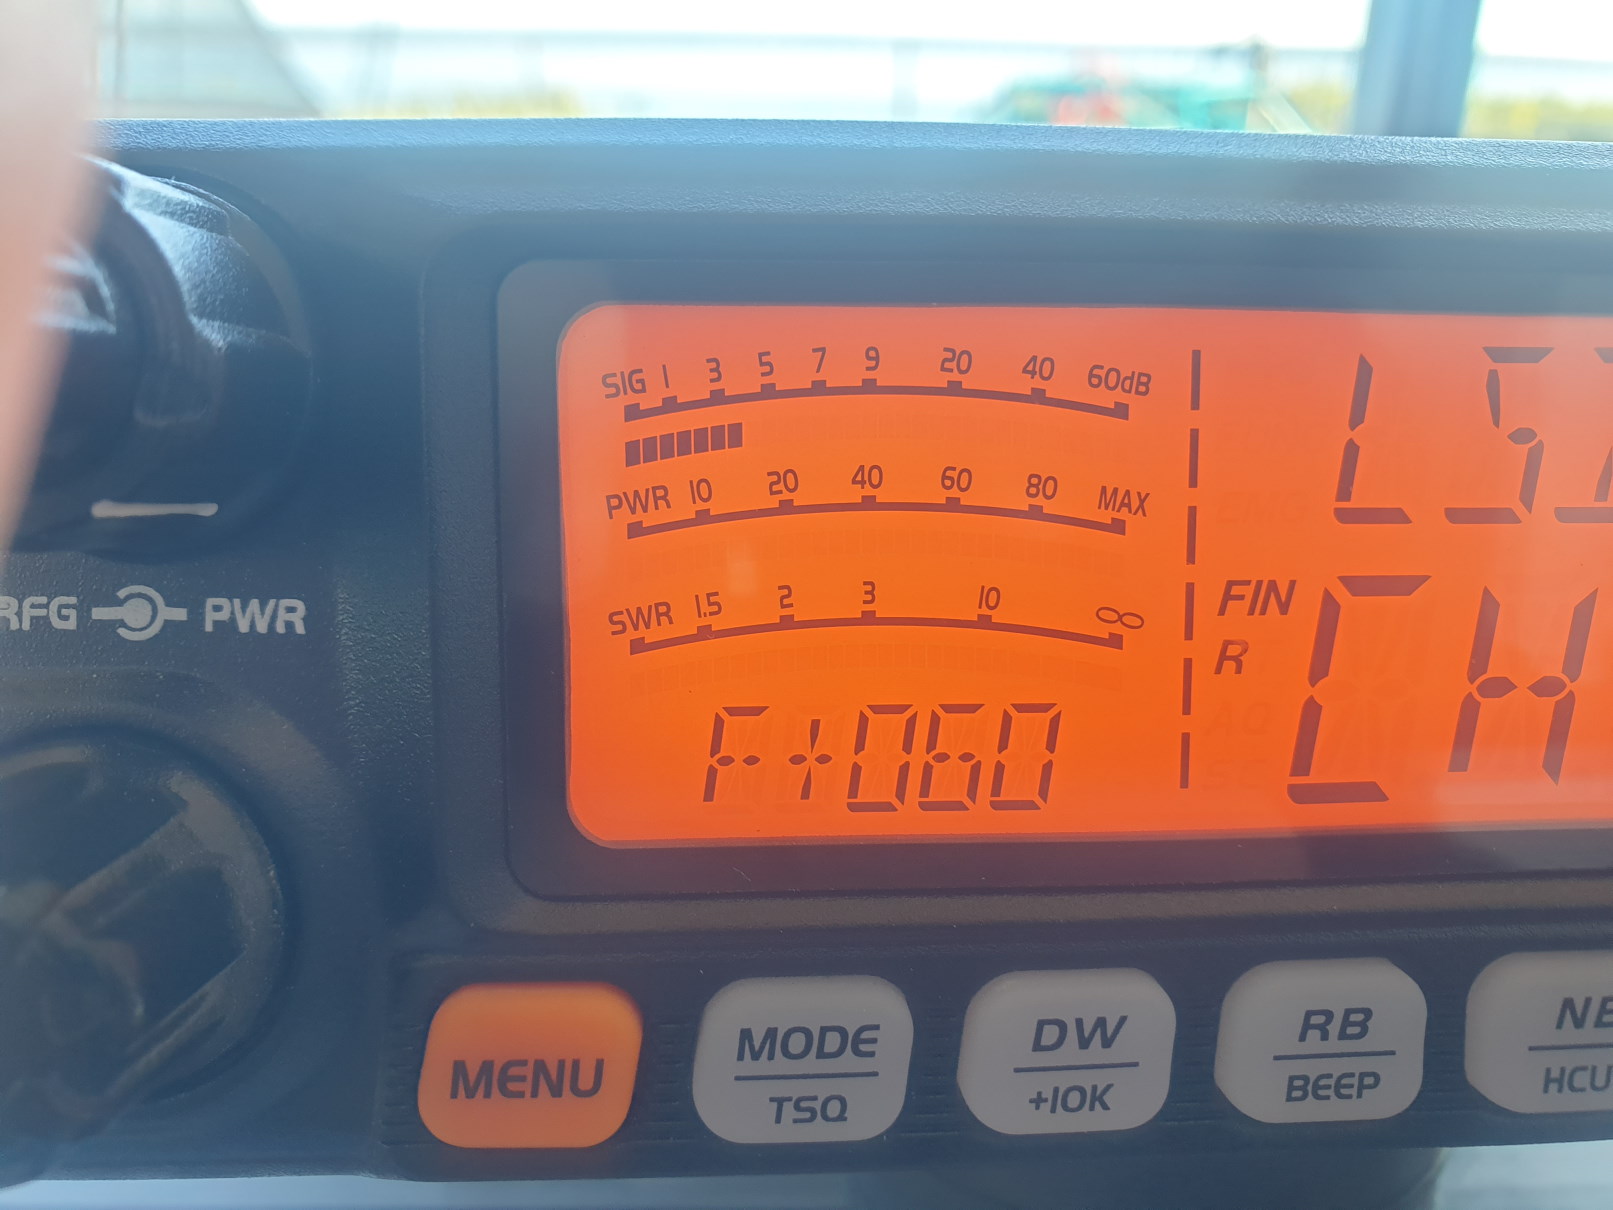
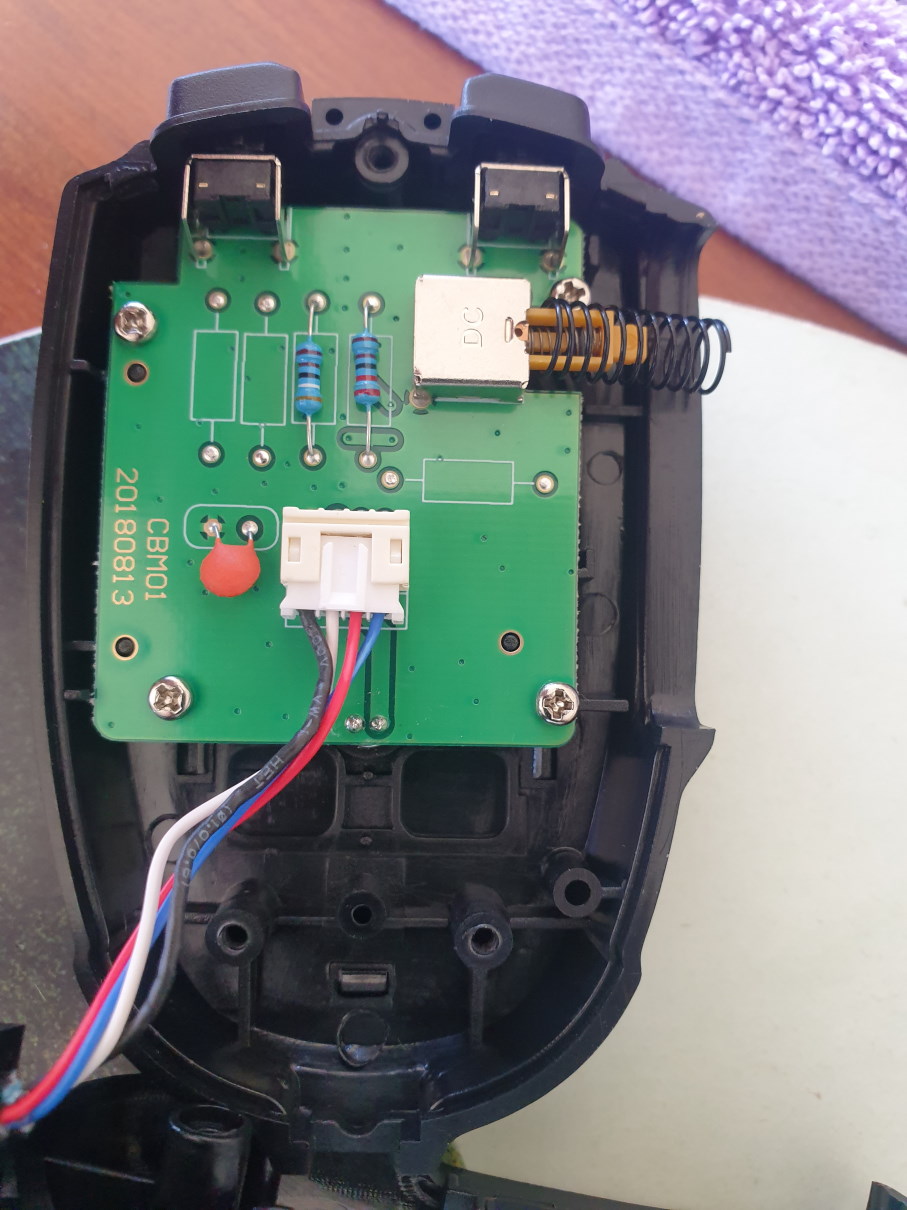
Expanding the frequencies. Out of the box it works only on 28 and 29 mhz. Of course we want 24mhz too. 12m is a legal amateur frequency after all. Open the case, snip the white wire and move the jumper (ala Lincoln 2, Mckinley EU, Grant 2 etc) you have 24.715mhz to 30.105mhz in 12 bands of 40ch in the Channel mode or one open band in the frequency mode. If you want to use it on the CB frequencies then keep it in the channel mode and it will step through the channels in each band in 10khz steps. If you switch over the the frequency mode then the step defaults to 1khz and is not restricted to the bands but continuous stepping. In the frequency readout mode the step is adjusted by pushing in the channel selector and can step in 100hz, 1khz,10khz or 100khz. The clarifier works like a normal receive only clarifier and the adjustment is shown at the bottom of the signal meter display. Neat. The Noise reduction on the AT-5555 Plus /N is not adjustable and set too high out of the box. It certainly reduces the noise a lot but doesn’t help the received audio and the volume needs to be turned up quite a lot to compensate. The AT-5555N II has an adjustable Noise reduction and it works very well allowing user to set it to suit the conditions and the required audio clarity. I like to see the output level and the SWR at the same time and this radio does that well. No need to push any buttons to see the SWR. Its always there in front of you. Because of the frequency mode and the adjustable steps I don’t see the need to program the AT-5555N II. It has full coverage out of the box. Forget the cable. If you live in the UK and want incorporate the UK CB band then this could be programed into one of the bands and accessed in the channel mode. But for the rest of the world: no need.
Showing clarifer offset
Memories. Always great to have. They both have 6 memories but with the N II you can program the mode along with the frequency. The AT-5555 Plus can only store the frequency as the mode selector needs to be changed physically. The AT-5555 Plus needs to be relegated to the scrap heap. It works, but is fiddly and despite the colourful display is cumbersome to use compared to the N II. It has nice audio and receives well but after you use the N II there is no going back to the Plus.
At this stage I can’t really find anything to criticize as an SSB radio. If you are a die hard AM user it may not have the loud AM audio that the older AM only radios can provide. Just one thing..it would be nice if the buttons were backlit.
Seriously sized heatsink and ventilated covers
What I can’t tell at this stage is how it stands up to adjacent channel interference when things get crowded. In our part of the world things are pretty quiet on the bands but if you live close to a few other operators you may find the receiver suffers. Time will tell. Hopefully not. Its a new board layout so there may be a few issues that will come to light further down the road. Anytone have been making 10m SSB radios for at least 10 years and their boards are used by many other radio retailers in Europe and America. They have had enough time to get it right.
The one issue that has been commented on is the lack of serviceable parts on this motherboard. I think that is a plus. Less to go wrong, less to get messed up. The components on the boards are rediculously small and will need specialized equipment to work on. I don’t know what they did with all the tin cans that needed tweaking and tuned. Maybe they are hidden under the covers or have been replaced by something else. Due to the computerized tune from the factory there should be no need to change anything. If you need to be louder then get an amplifier. It just remains to see how the receiver performs when the band gets busy.
Electret Type Mic on AT-5555N IIaditional driver on AT-5555 N IIExpansion modAT-5555N II BoardComparitive size of heatsinks
The Programming Software. The following pertains to the AT-5555 Plus/N. I don’t see any need to use the program to change anything on the AT-5555N II at this stage. As with all windows software: Do not connect the cable to the computer before installing the software for the program and driver for the cable. 2 parts to the install. Install the software first. Then go in to the software in the computer start menu and install the USB to comport driver. After this step windows should find the correct driver for the cable when you attach it to the computer. Attach the cable and check the port in Device manager to make sure it does not have an error message associated with it.
Attach the cable to the radio and turn on the radio. There is nothing on the radio to show anything has been connected. Open the program and it will show up in the 10m mode with a list of freuencies. To test everything attempt to download the list of 10m frequencies from the radio to the computer. If it reads correctly the screen will show PC and the list of frequencies will be shown in the program on the computer. This should be the same as the frequencies already in the program but it is a good idea to save it as something else anyway. Before using the software to program for the 11m and 12 m bands with the radio off, hold in Func and EMG buttons and turn radio on and release the buttons. Band 1 will show on display. Rotate the channel selector clockwize to Band 2. Hold the func button for several seconds untill Rend is shown on the display. turn radio off and on and it will fire up in the 11m mode. Change the program from the 28mhz setting to the 25mhz setting. For every band there will only be one frequency loaded which is not of much use. Using the template you can now go ahead and fill in the program with what ever frequencies you wish between 24.715 and 30.105 Mhz. Before you do this I reccomend you read from the radio and save the DAT file so if you ever mess things up you can reinstall the original 11m file.
The KL203 is a neat little amp. Not much bigger than a couple of packets of cigarettes and in New Zealand and Australia not much more expensive than a couple of packets of cigarettes either. It doesn’t cost much and plays well with all radios with outputs up to 4 watts AM or 12watts PEP. The enclosed brochure indicates that the KL203 will work on all frequencies between 20mhz and 32 mhz with about 10db gain. The brochure also states it is forbidden to use it on 27mhz. Nothing to stop you using it on CB mind you, (just don’t. hahaha) It works extremely well on 27mhz. Very linear, no noticeable degradation of the SSB audio. On SSB it is normal to see around 80 watts from a standard 12w CB radio. The only fitting is a piece of coax from the radio and the antenna. Fixes easily to the radio case with stick on velcro. No soldering or need to open the radio. The amp contains 4 little IRF520 (equivalent) mosfet transistors driven in parallel.
I was expecting the amp to get warm as I was driving it with a 12w USA 40ch McKinley SSB in the car but strangely it doesn’t. Otherwise I would fit a fan but doesn’t seem to need it so far. In fact, I then decided I could drive it with the EU McKinley with about 20w PEP and it handles that well too, for about 120w PEP out. (So far so good and if I blow it up I will let you know.) In use if you are getting out barefoot over a 7 on the S meter the amp won’t make much difference, S meter goes up and the audio a little louder, But if you are in the mud: being heard S1-S3 on the other end this little amp can push your signal up to S7. The brochure states drive levels of 0.5 to 10w and 100w out but doesn’t say in what mode. In my experience these mosfet devices can do OK with SSB but they don’t like AM or FM for very long. Turn the drive down to less than 4w if using AM or FM. No sense in destroying it unneccessarily. To me this is primarily an SSB amplifier. SSB is where it shines.
I would not buy a 100w CB radio with all the heat and issues they present when you can buy one of these for under US$100.00 and keep the heat and RF out of the radio. Need more power? Turn it on. Too easy. Replacement transistors are cheap and plentiful and RM even sell replacement fully assembled boards to drop in.
There is also a KL201P that incorporates a receive preamp but I have heard that if the preamp part goes south the rest of the amp won’t work. The next amp up is the KL503 which has 9 transistors, 1 driving 8. I tried a few of these a while back and they did not sound nice on SSB at all. Rumor was the driver stage was class C and that messed up the rest of the amp. They also brought out the KL503 HD which I think just has 8 of those little mosfets in parallel. But they are 4x the price of the KL203. Thats why I am sticking with the KL203. Thats the sweet spot.
If you haven’t got one to give your stock standard CB radio a really good lift, Get one. Same for truckies…having trouble being heard? The KL203 is probably your cheapest option. 26mhz, 27mhz and 10 meters. No problem!
Who is still making SSB CB Radios these days? Last rattle out of the box was President with their Mckinley EU, and a nice radio it is too. With 3 versions of the Lincoln 2 and Grant 2 before they got it right, it was refreshing to find the McKinley worked well right out of the box. And there have been no further revisions to date.
Since releasing the AT-5555N we have not heard much from Anytone. They probably make more SSB 10m export radios than everyone else put together but with only Ranger and president left that isn’t saying much. Ranger keep dishing out the same old shit with more power and more chrome. Nothing new under the hood there.
Anytone say they are having to revamp their 3 SSB 10m export (AT-5555, AT-5555N and AT-6666) radios due to difficulty sourcing components. This must also impact all of the makes that rely on Anytone for their radios: President with the lincoln 2, Strykker’s 955, and sellers like KPO, CRT, Hanover and many more who rebadge the AT-5555 or AT-6666.
I wanted to buy a few more Anytone radios to prop up the stock levels before the 11m band really gets cooking again but was told I will have to wait till March next year before the new models are ready to roll out. I have really started to like the AT-5555N for simplicity and style, but the AT-6666 really is the star of the show for me at this stage.
From what I can gather they will be making a few changes to the various models and KPO already has a video out for the new AT-5555 but it didn’t really demonstrate any of the new features in action, or explain what they achieve. I will list a few of the anticipated changes that may or may not be present in all models as a lot depends on who they are being built for. Visually they look the same from the outside.
Frequency will be increased from 24.7xx thru to 30mhz picking up the 12m band. VOX will be available. CTCSS/DCS tones available A Transmit Noise Gate function A Receive Noise Compander function A Noise Reduction function Roger Beep Menu CW Side tone The ability to Transmit a single tone frequency from 300Hz to 3KHZ Menu choice of selecting Electret or Dynamic microphone (Just like the McKinley!) The above functions are in addition to the HiCut, ECHO, NB and all functions previously included with the AT-5555 models The AT-5555 will be renamed the AT-5555 Plus and the AT-5555N will become the AT-5555N II The power has been increased from 30w PEP to 45w PEP for the Plus and 60w PEP for the N II. Maybe they have found a new final transistor as well. Hopefully they won’t file off the markings if they have!
There are a few samples out there and no doubt KPO and CRT will be first to get their radios on the shelves and the little guys will just have to wait for the Anytone versions and hope they include all the goodies as well. And I hope they get it right first time cos it looks like a completely new motherboard.
I will have a few of these radios shortly and I will put them up for sale ex Stock. Email me on 91dd018@gmail.com if you are interested. Also included will be some Super Jopix 2K. Ex Stock New Zealand.
No new SSB radios on the horizon that I can see so I guess us CB sidebanders will just have to use second hand ham rigs from now on once our SSB CB’s grow old and unfixable. Hard to find anyone who wants to mess with them any more too…the old techs are a dying breed
Yeah Baby. 11m is cooking once more. Its been such a long time between drinks on CB. I had to remember what callsign I had to use and try not to spit out the wrong one from time to time. No 6 son had decided to return home and reclaim the radio shack, so I had dismantled the radios and antennas I had been using. It is Summer here in NZ so was spending more time out and about than on the radio anyway. I did not even have an 11m radio on the bench or an antenna. I pulled an AT 6666 out of the cupboard and stuck about 4.5m of wire on the end of a 49:1 transformer and up she went. WOW. East coast of Aussi booming in to the west coast of the North Island. Doesn’t take much to talk across the Tasman on 11m when conditions are in. Channel 35 LSB was chokker blok and folks were talking about staying on other channels to escape the mayhem on 35. Just when I thought CB was dead. It was all there; just like the old days…
The AT-6666 was a bit of a surprise. Despite the fiddly knobs it has a very capable receiver and I was surprised just how good it is. Like all modern radios it is way too sensitive and it is just a matter of backing off the RF gain a little and compensating with more volume to drop the white noise. The mic gain out of the box was set on 30 out of 36 max and it seemed a good match for my voice. Nobody has said it isn’t loud enough yet. It is putting out around 40 watts PEP. I know people have had them do more but its running cool so I will leave it there.
It is one of the few radios out there that can cover the old NZ 40 ch CB frequencies from 26.330 thru 26.770 and match the channels to the right frequencies. Anytone use a computer program to write the frequencies into the corresponding channels then load it into the radio. In the expanded state the AT-6666 has 10 bands of 40 channels and each of those can be individually programmed with frequency, mode, beep, hicut etc etc. I usually just input frequency and mode but Hi Cut helps drop the hiss on SSB for sure.
So I got the NZ 40ch in Band A and the US normal 40 in Band B. What to do with the rest? Free band is hardly a thing these days, the upper channels are empty. People are staying off them which is fine with me. There is more than enough vacant channels on the 40 permitted: for the time being. Still…I programmed C and D bands with the free band in 5kkz steps. Forget about channels up here. And then a bunch of 10m also in 5khz steps.
But it was a bit of a dog to navigate around. I needed to be able to jump around a bit easier. Memories! The AT-6666 has 6 memories. So I got the NZ truck channel of 26.450 AM in Mem 1, The hawaian AM’ers on 27.045 in MEM 2, channel 35 in Mem 3, 28.490 in the 10m band in MEM 4. That made life easier.
The FRQ button. Then I discovered something strange about the AT 6666. In order to check what was in the memory I would toggle between frequency reading and channel by pressing button FRQ on the top right near the channel selector. When the radio is in the frequency readout mode it does things differently than if left in the channel or memory readout mode. If you leave the radio in the frequency read out mode you can move away from the memory/Channel frequency in whatever steps you select from pressing the selector knob. Downside is that where ever you leave it becomes the new memory for that memory position. If left in the channel or memory mode rotating the selector scrolls through the memories or channels as it should. Everything remains intact. The downside of staying in the frequency readout mode is that you will change whatever was previously programed into that spot which is not so good. So before you switch off or change back into channel mode you should return to the original frequency for that channel.
For the 10m band this doesn’t matter, but for the 40ch CB bands this will mess you up when channel 35 turns into 27.395. So if you are on CB stay in the channel mode.
Where did this radio come from? Why? In a world of cheap SDR and BITX radios is there still a place for a new analog radio. Kenwood thought there was so they released the TS890. Yaesu sat on the fence with the FTDX101. These are not cheap radios.
The RG0 One is not cheap either when compared to the FT891 and the IC7300. It costs more than the 891 and as much as the discounted 7300’s currently on sale. Boris’s aim is to release it as a kit in which case costs will come way down.
I will have to wait till I get my 891 and 7300 into NZ to compare them all. It will easily keep up with them in the receive department but the 7300 and 891 are loaded with features that the RG0 One doesn’t have. It can easily be argued that it doesn’t need them either! After a while you don’t miss the Auto notch and DNR and the hundred menu items.
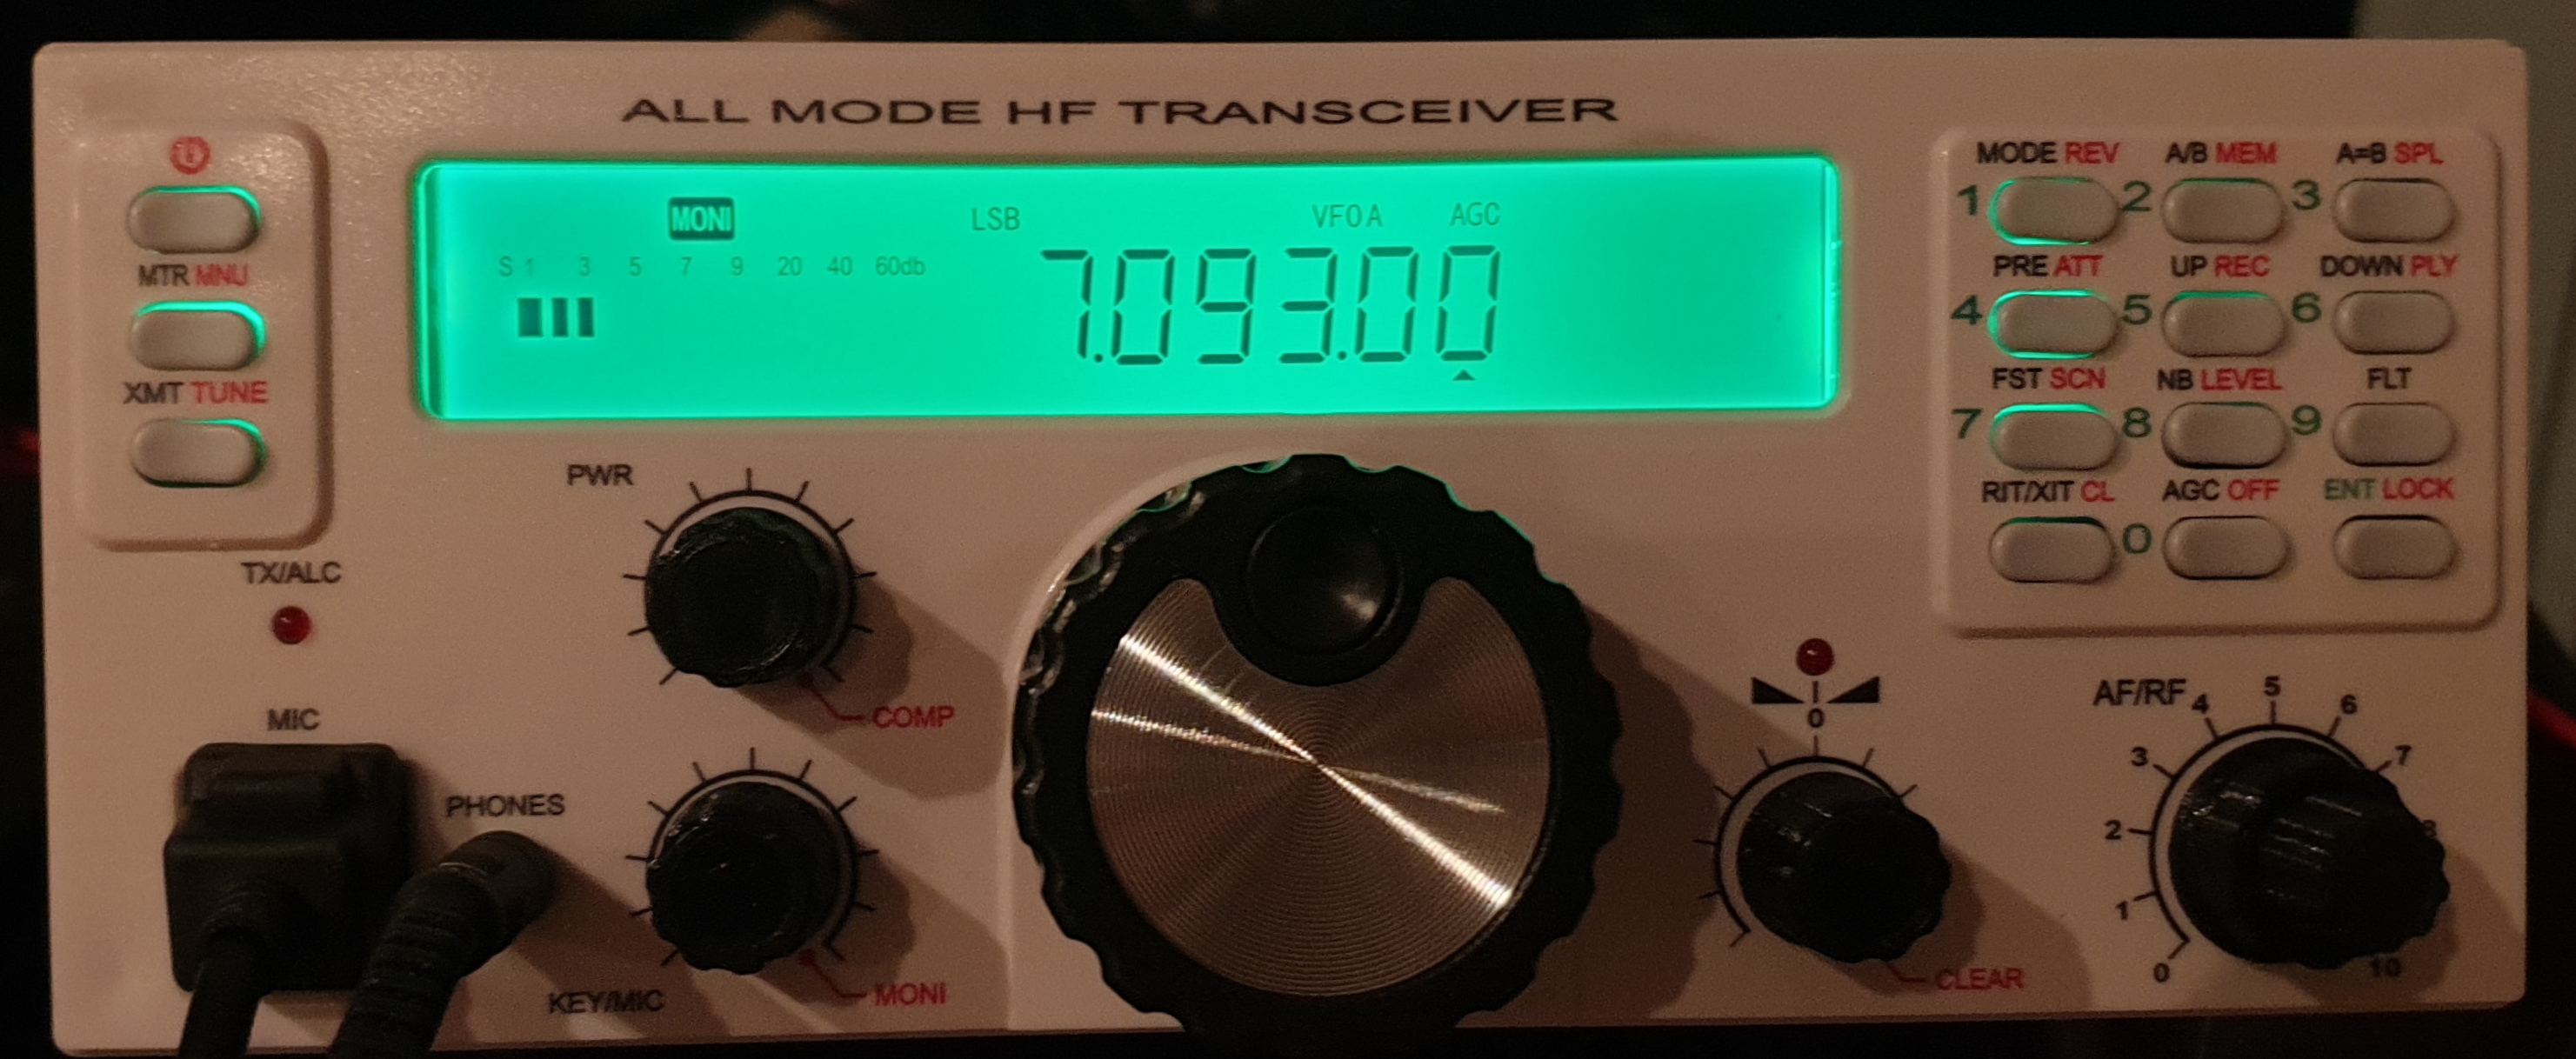
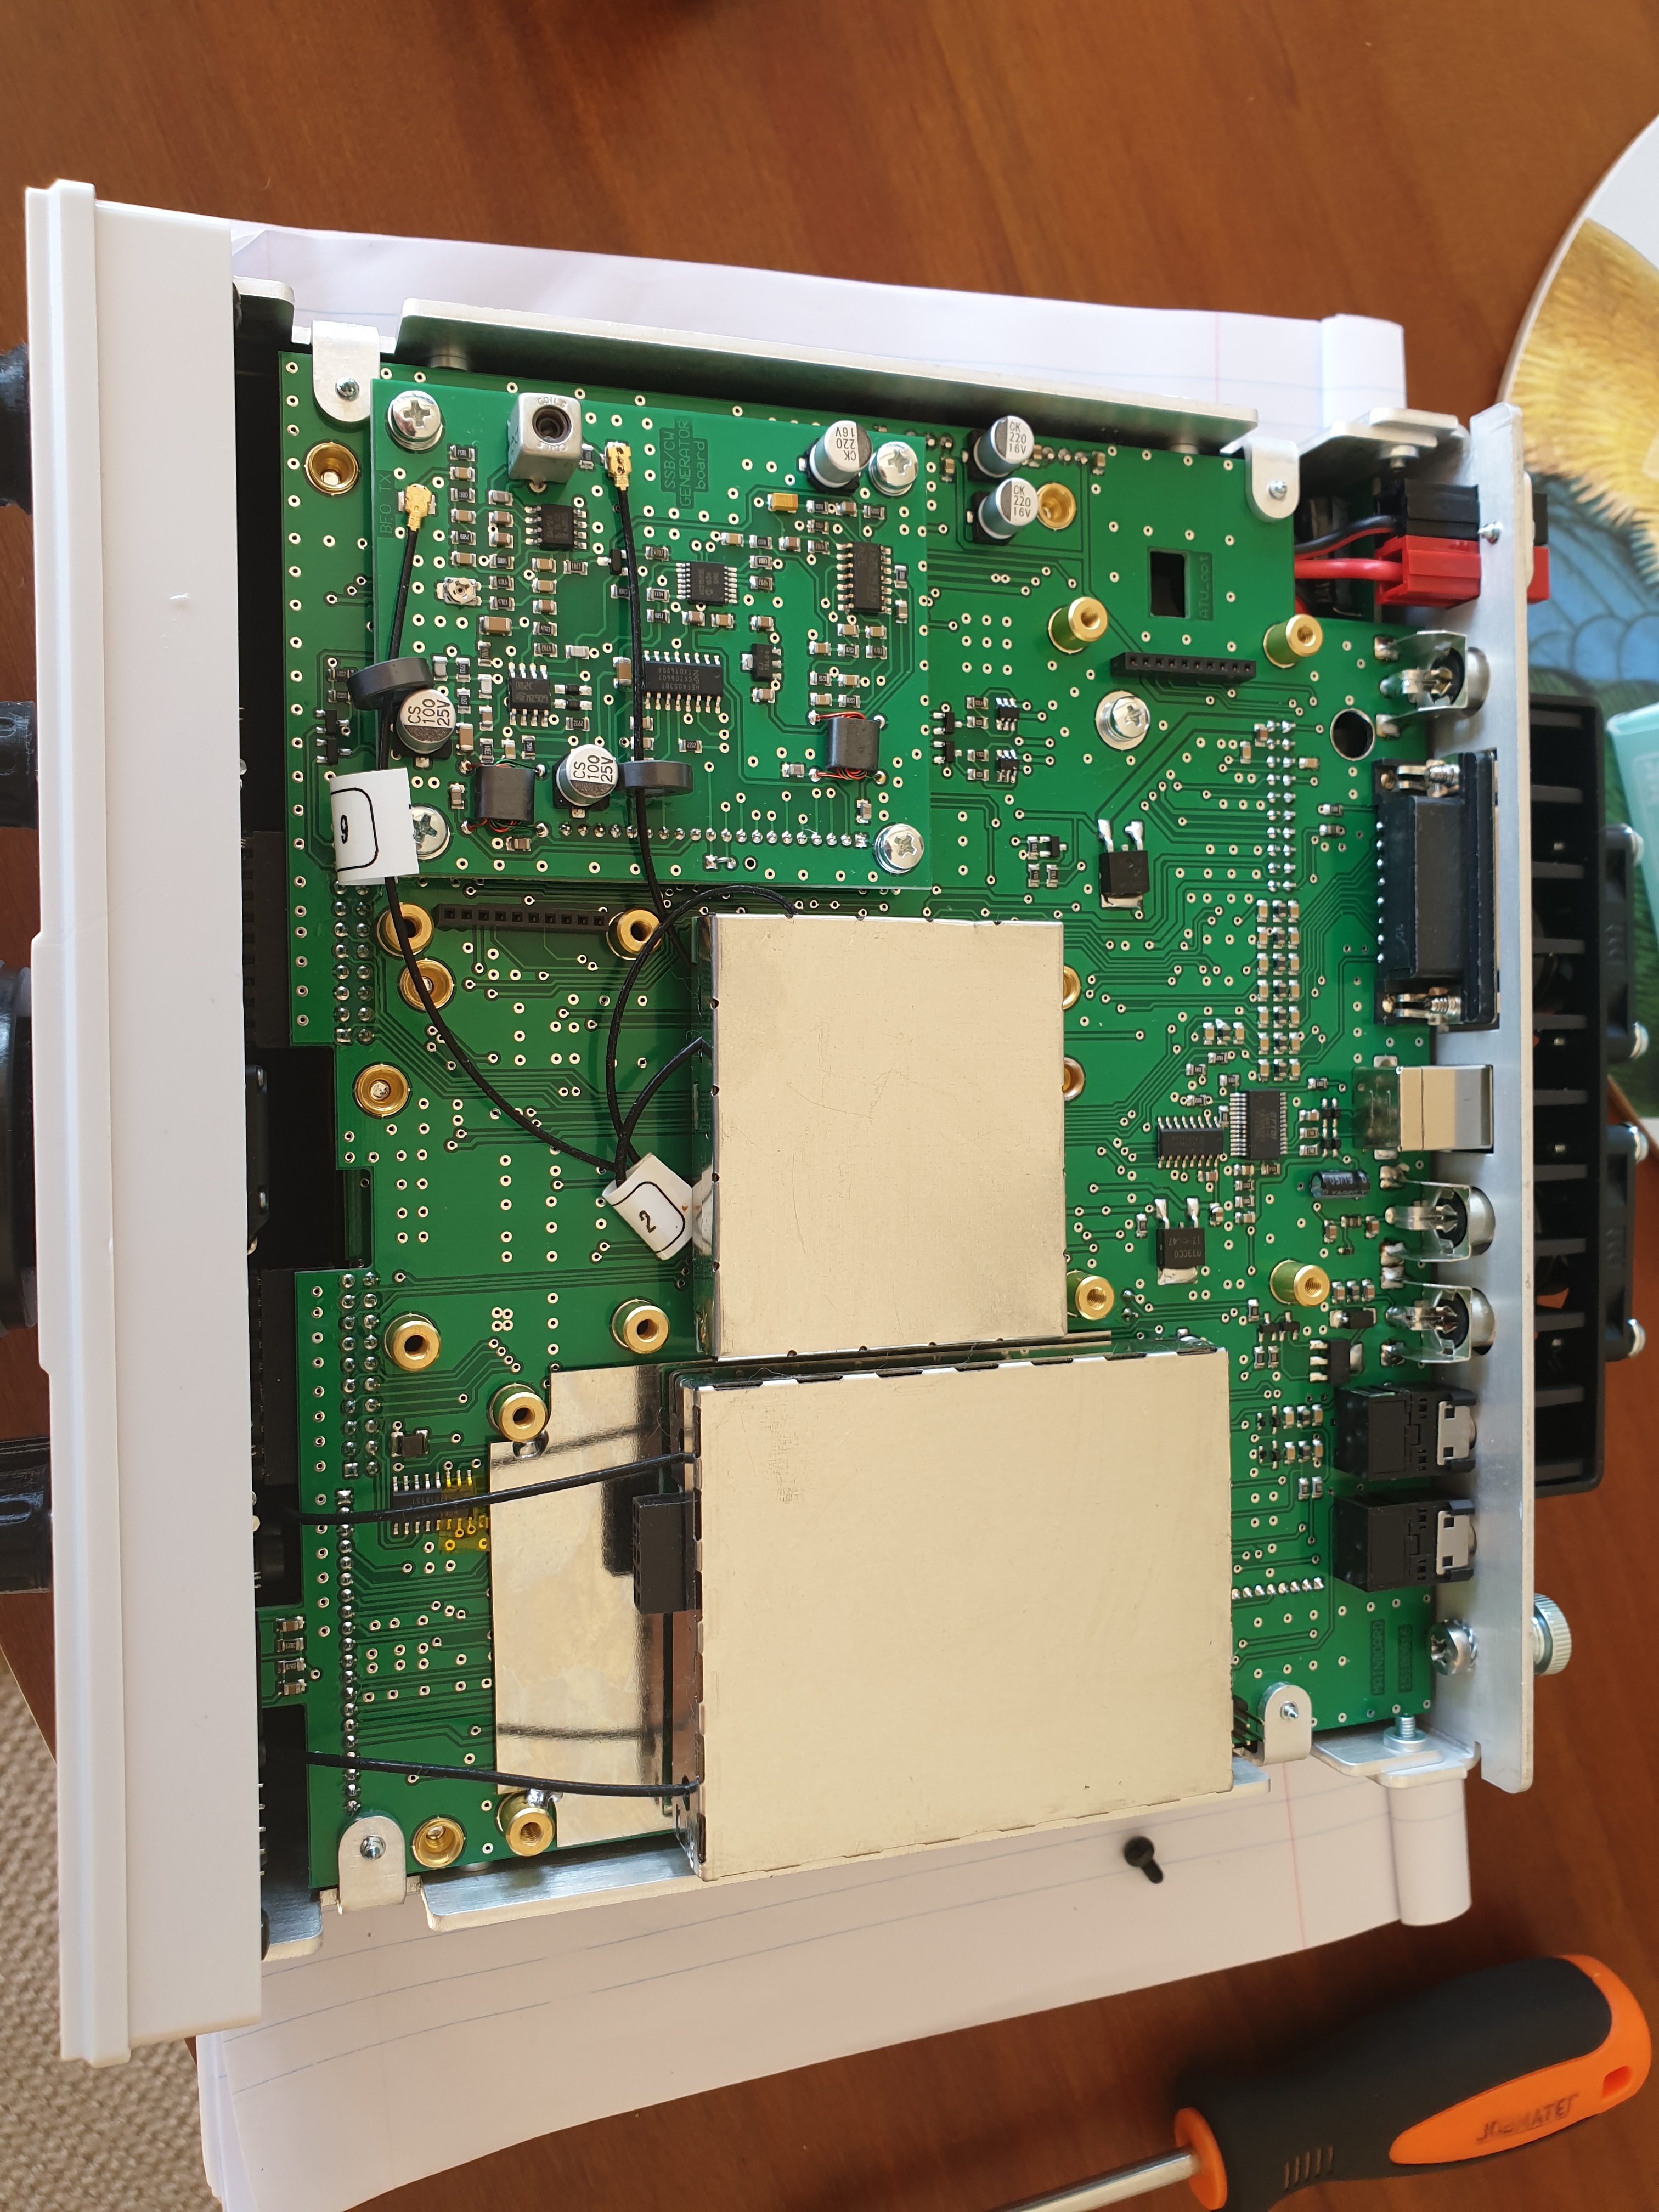
This analog superhet radio is designed and made in Bulgaria. Boards are made in China and populated and assembled in Bulgaria. It doesn’t have a lot of bells and whistles but what it does do it does very well. It is simple to use with extremely effective clean receive audio.
It is a Ham bands only SSB/CW radio featuring a very quiet and robust analog receiver. In today’s world of SDR and digital everything, it is refreshing to come across a radio that is just that: A radio. With real filters and real crystals.
Transmit audio is solid. No complaints. Mic gain from 1 thru 10. 4 was right for my voice.
Prior to putting the RG0 one on the table I had been using a Xiegu G90 SDR for about 6 months and had got very attached to that little radio. But it suffered badly from AM Broadcast band overload when using an end fed half wave antenna. It needed a hi pass filter in line to be able to receive anything, anywhere, with that antenna.
I did not realize how dependent I had become to the band scope when tuning around the bands, using my eyes and my ears to tune signals. It took a while to get used to the RG0 One and using just my ears without the benefit of seeing where the signals were before tuning them. It felt like hard work having to tune through the entire band to see if anything was about! But when the RG0 One locked on to a signal the difference in audio was obvious. The signals were clearer and quieter. More readable. Less work to listen to.
The tuning knob is silky smooth and rotates easily.
My model was the basic 3.5mhz to 30mhz transceiver. I did not want the tuner or the 160-6m option. I just wanted a basic SSB/CW Ham Bands only radio. There is no AM or FM mode. It has 99 memories…not that intuitive to use but they work. What you can’t do at the moment is tune out of the memories. You have to get out of the memory mode and back into either of the VFO modes. It does everything most radios do these days. It has a Menu system to adjust stuff and load the firmware. Two VFO’s. But you cant see the contents of the “other” VFO on screen.
At the moment the modules for Noise blanker, Speech processor, Notch and Noise reduction are still under development and will be incorporated into future production. Mine did have the variable narrow filter option but I think I need to adjust the menu offset settings to suit my ears for sideband use. It will certainly narrow the bandwidth down to less than 500hz for CW operation.
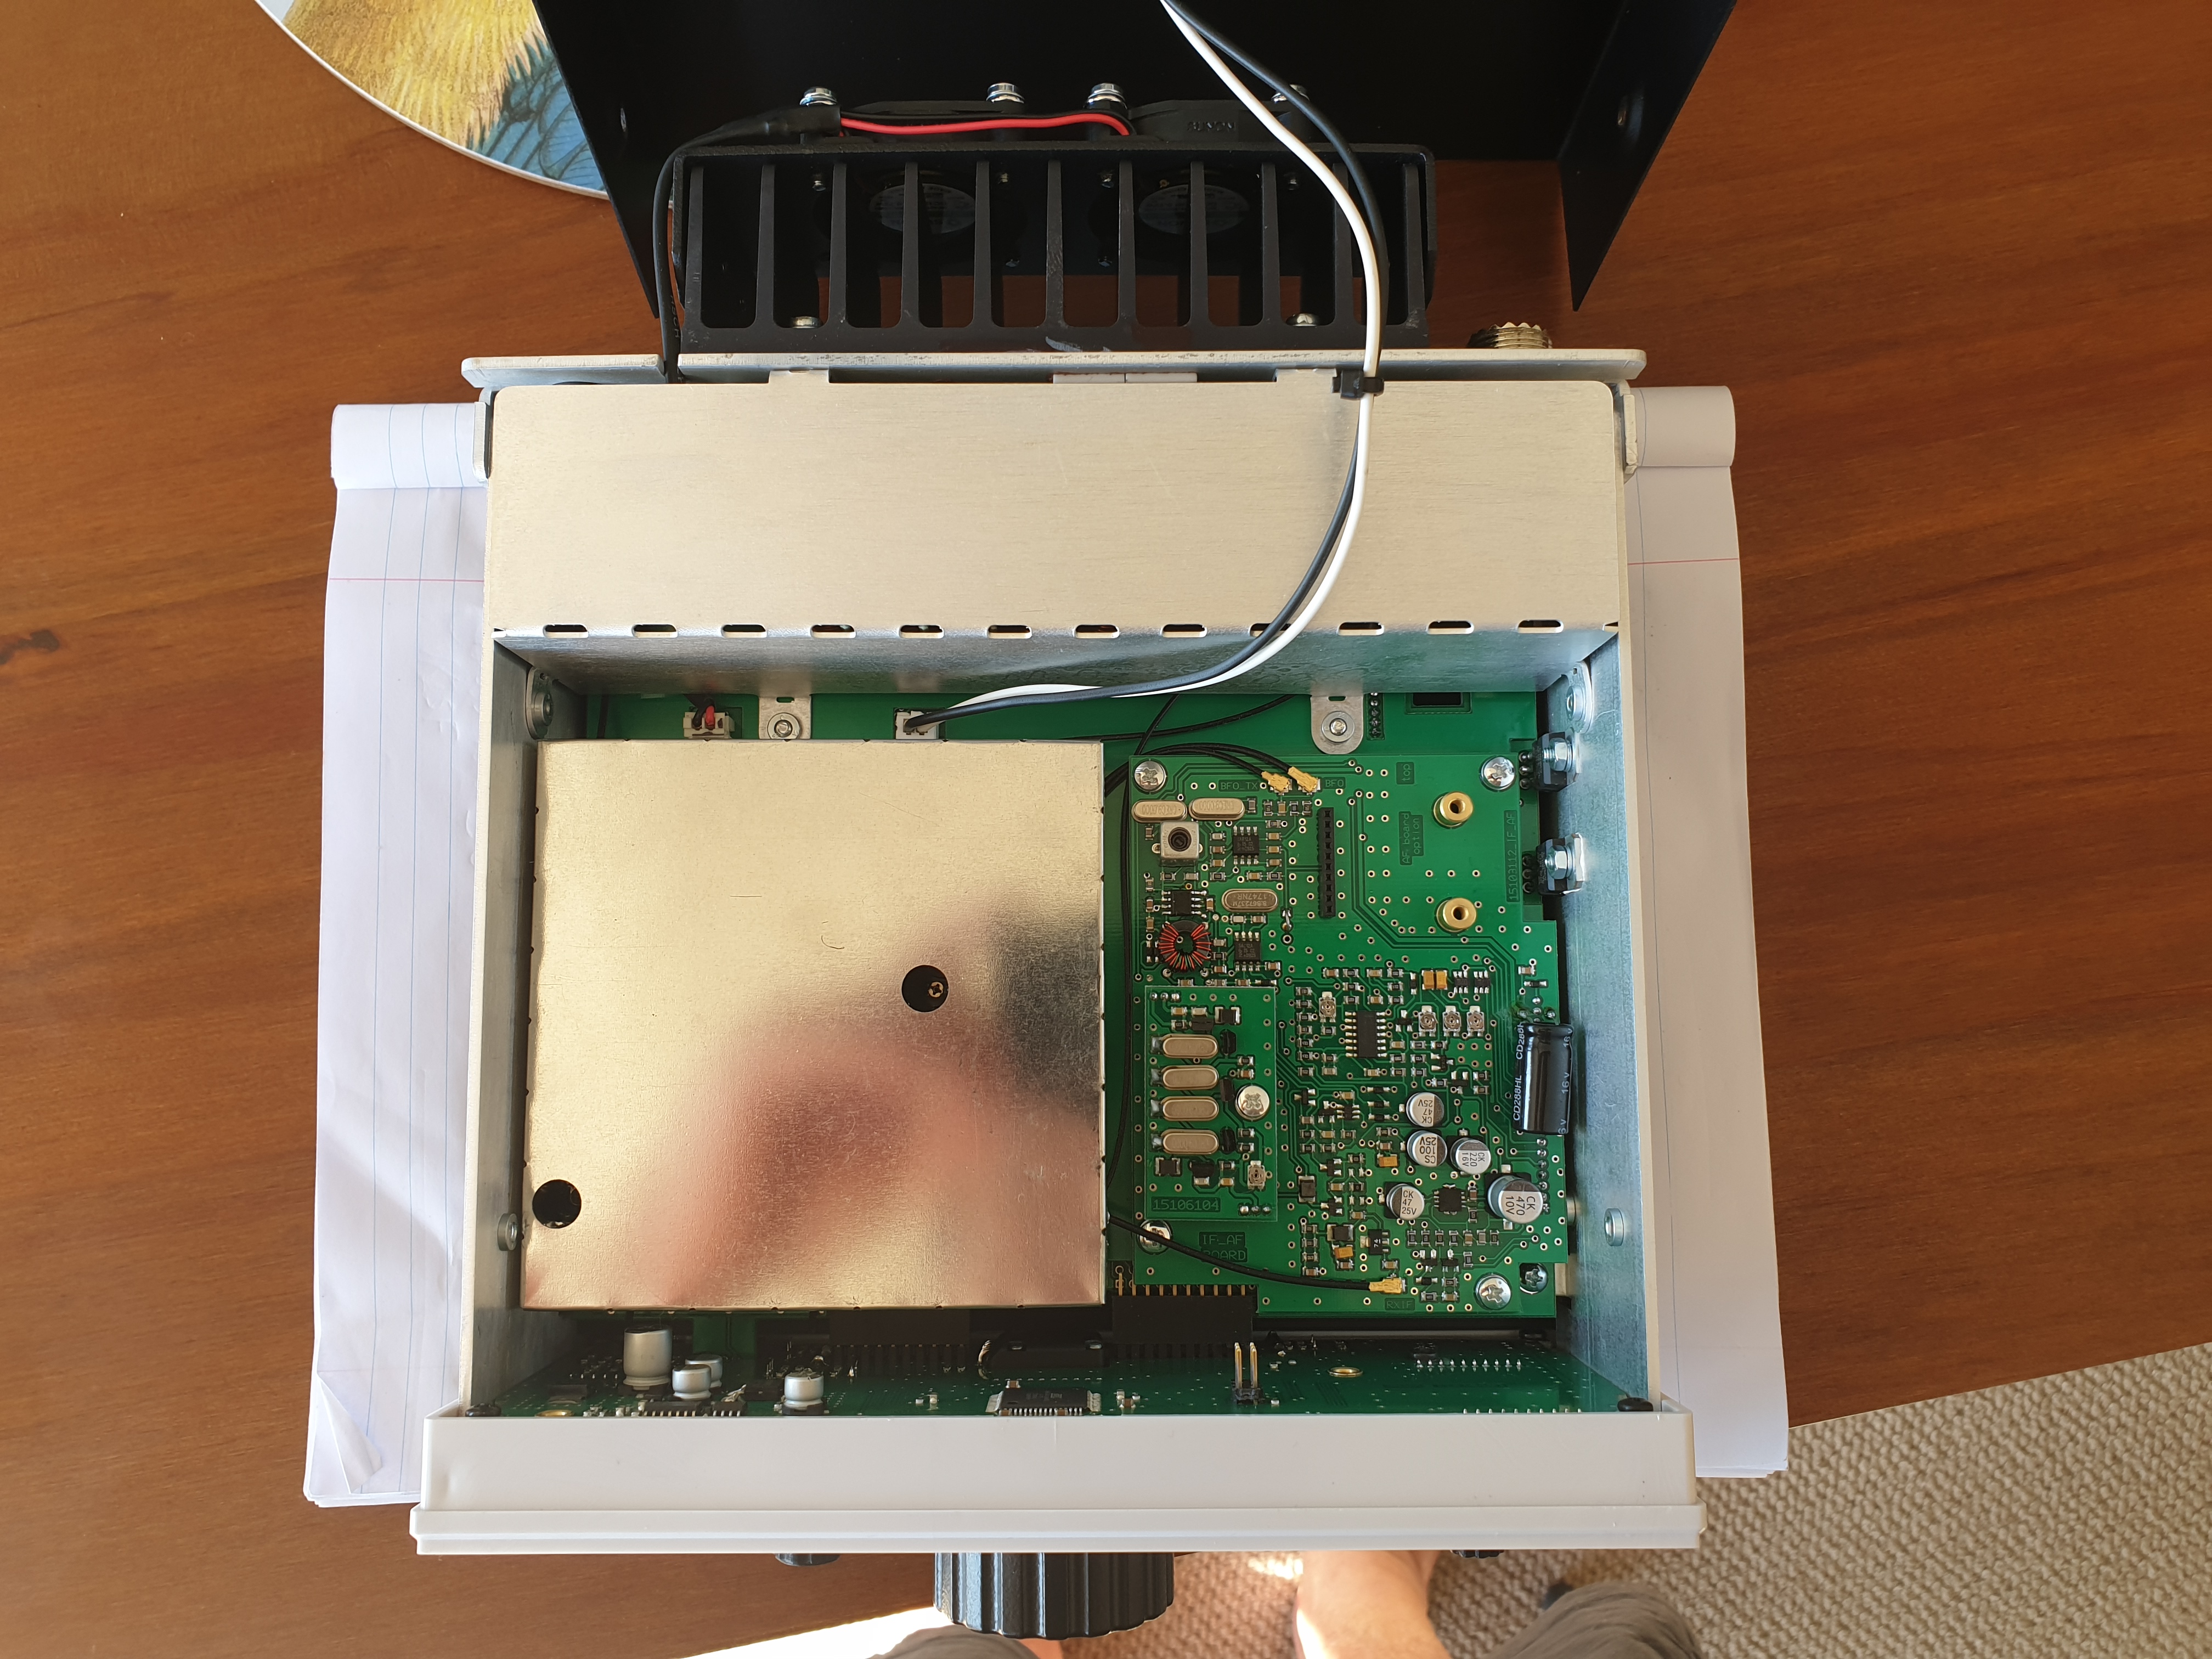
I noticed I still suffered BCB interference with my endfed antenna on 80m. I emailed Boris and he responded saying that they no longer used MW AM stations in Bulgaria so he did not fit a BCI filter in the rx line. He will do so in future and promised to send me the unit with instructions where to fit it. It is plug and play like the other option boards. Thanks mate!
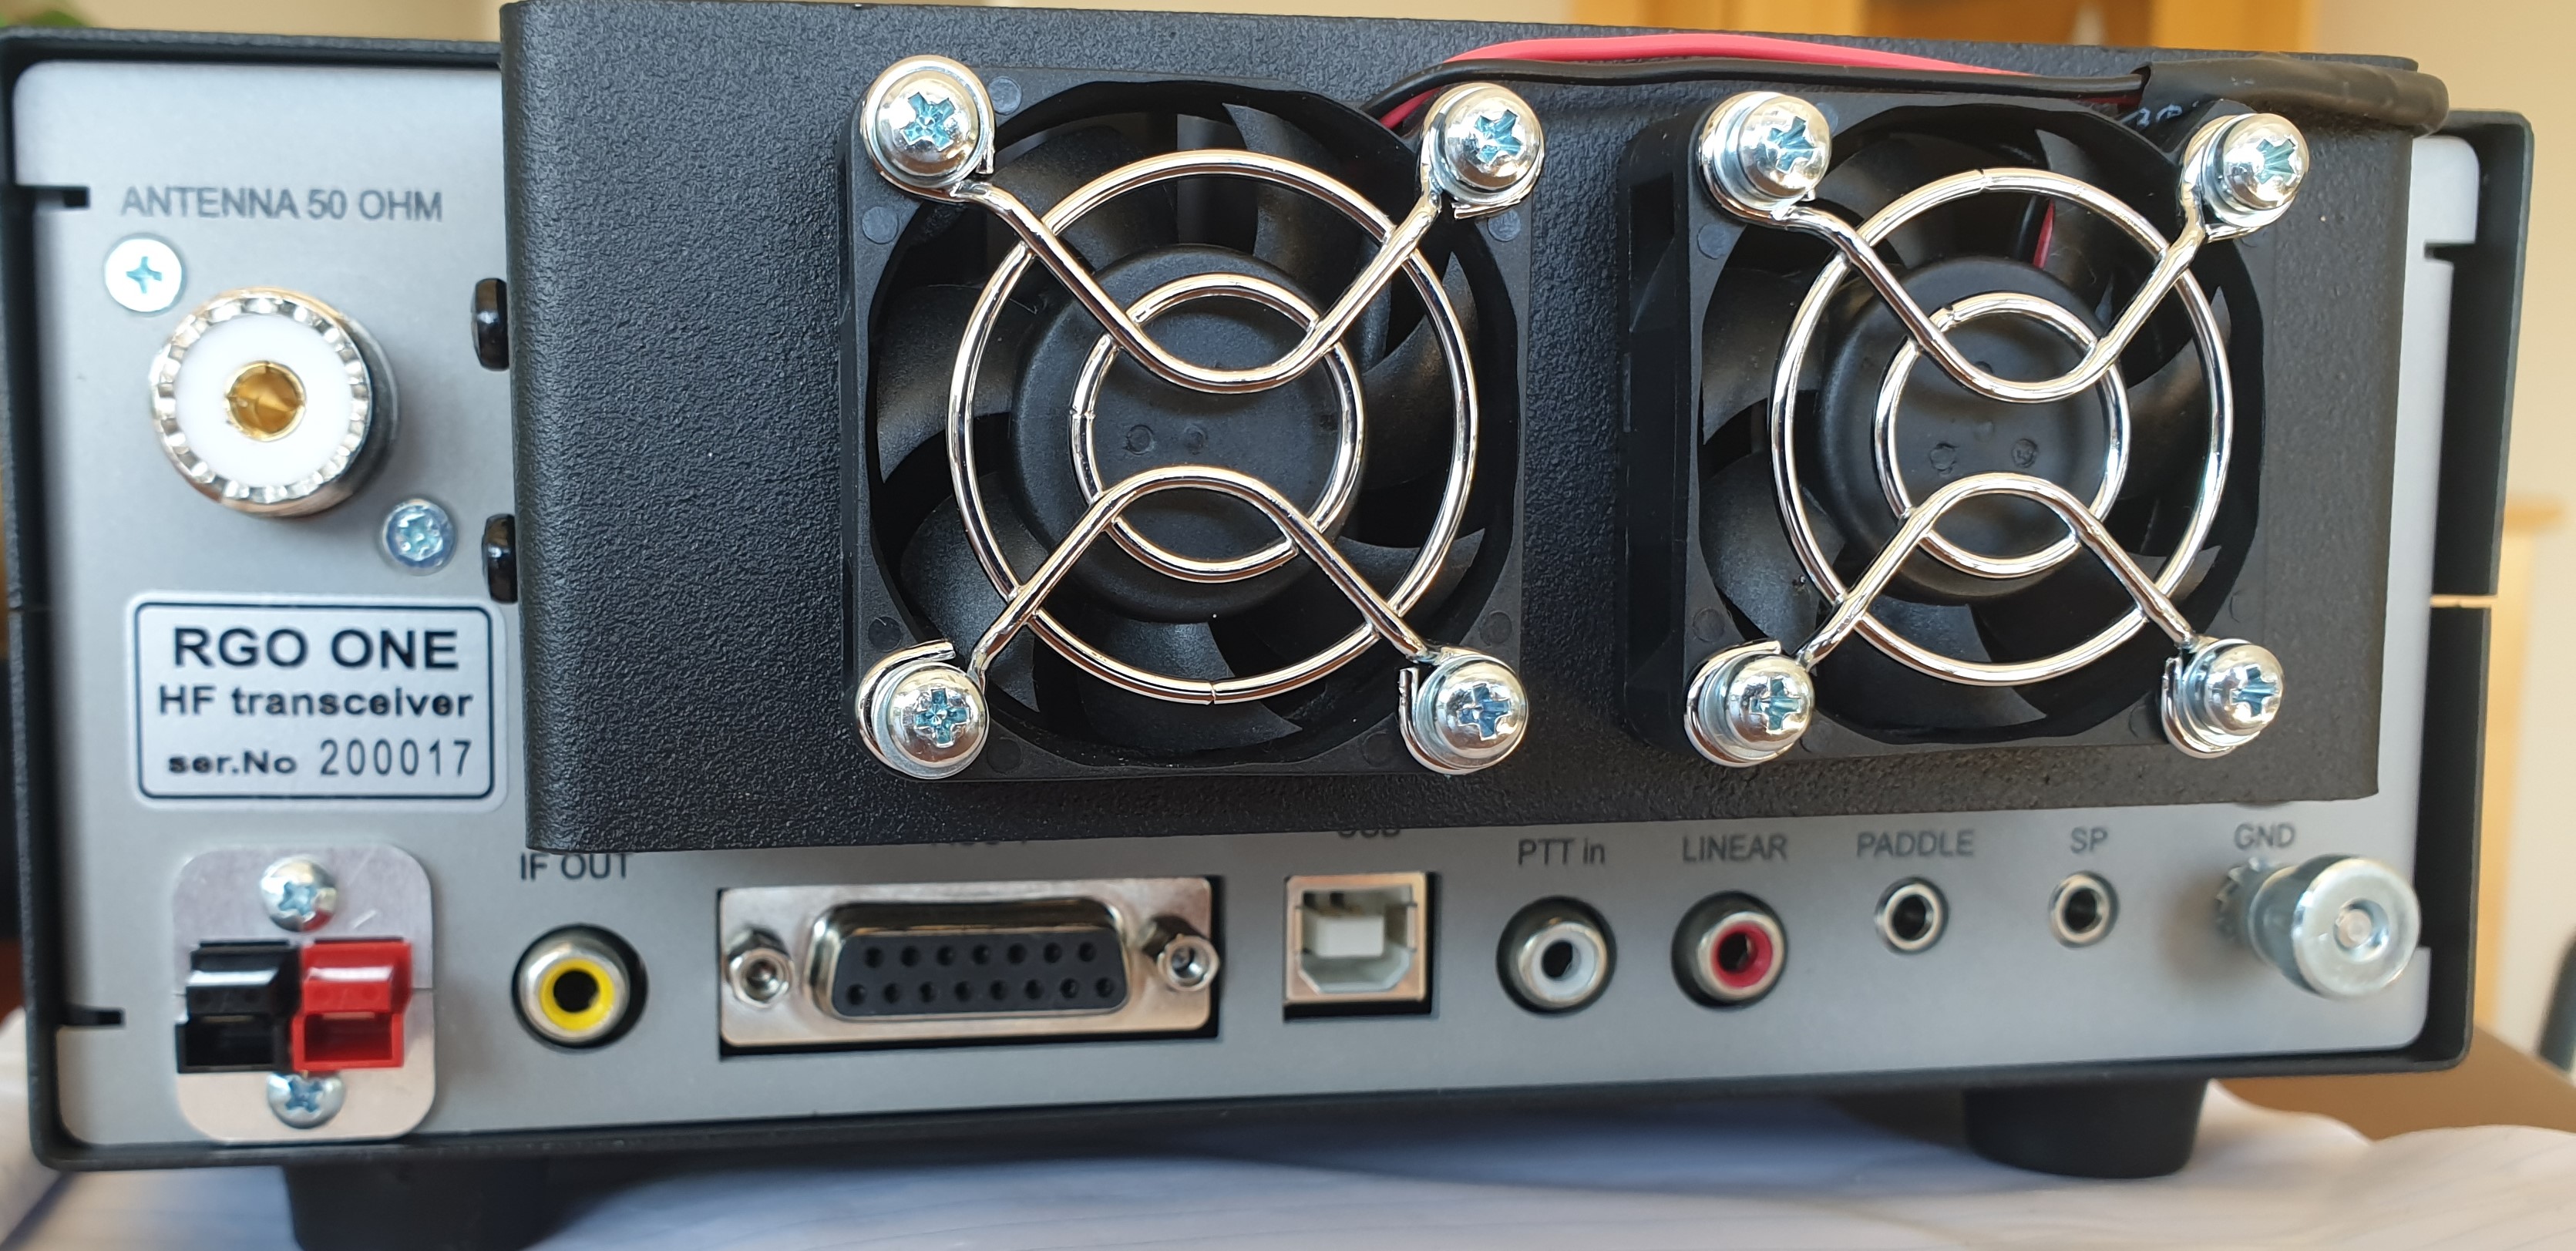
On the transmit side it puts out 50w PEP. It has a large heatsink and a couple of fans. I have not noticed the heat sink heating up or the fans coming on with long overs. It stays cool. Its a cool radio. The white face is different. The knob to scroll the memories and adjust the variable filter is not marked. I am sure it will be on future production.
What we have here is a really nice well built Amateur Transceiver that will more than keep up with any sub 3000 dollar radio in production today. Keep it up Boris. It can only get better!
I think I have found the antenna for me going forwards. After playing with the half wave coaxial vertical antennas for some time, the only one that really worked consistently was the 10/11m version. I could not get rid of the CMC’s on the 20m version no matter what I tried so have given up for now. I went back to the inverted V but it was a hassle having to erect it and tear it down all the time. it was also a visual eyesore. The SWR would change based on height and angle and any nearby objects. I was always getting it tangled up so deployment took quite some time, not to mention needing 2 points to tie it off in addition to securing the base. But when in the air, it worked nicely and received quietly and transmitted well. Tried to add a 20m wire to the feed point of the 40m inverted V but neither antenna seemed to work as well, so gave that up. Consequently band changes meant antenna changes and more time wasted.
I was convinced a half wave vertical was the way to go for ease of deployment. The 12m telescopic poles stay up very well with just a light wire taped to them, I just needed to feed it correctly. Enter the 49:1 un-un. This is what I bought. https://myantennas.com/wp/product/efhw-8010/
10-80m 1kw no tune on the various bands it is resonant on.
There are many other designs using a 9:1 un un but they require a tuner to get usable SWR to the radio. I didn’t want to rely on a tuner so did not look any further at them.
A European company making similar antennas using a 49:1 un-un can be found here: https://www.hyendcompany.nl/tech_info
Half wave verticals have always worked well on 10 and 11 meters and most did not incorporated much in the way or radials, so it stands to reason they would also work well on 20m (if we could get them up high enough.)
For 20m we can easily attain this with a 12m push up telescopic fibreglass mast. Half wave verticals do not require a complicated ground plane system like 1/4 verticals. It is not to say they won’t benefit from an extensive ground plane but they do seem to work well without much in the way of counterpoise or radials. They also work in all directions. No need to rotate.
The 80m wire (40m long) that came with the 49:1 Un Un feed box was way too long to use so I cut a 5.5m length of light weight 2mm insulated wire and started playing around with that on 20m. To get a low SWR I ended up trimming it back 9.15m. The SWR at 14.2mhz was 1.3 and did not rise above 1.5 at the band edges. According to the antenna analyzer the resonant frequency was 14.6mhz despite the lowest SWR at 14.2mhz. I also used 2 ea 2m radials and I think if I play with these I can change the characteristics to bring the resonant frequency and the minimum SWR a bit closer together.
I noticed several things while using and testing this length of wire on 20m with the “My Antenna” 1kw 49:1 Un-Un. It is not a balun. Everything to do with this antenna is unbalanced! The performance improved remarkably once we got the feed point up in the air a few meters and out in the open. It does not like to be around other metallic structures or antennas or feedlines. It is also susceptible to noise and nearby radiation sources. I noticed a lot of bleed over from nearby AM transmitters when in AM mode. Fortunately there is a lot of information on the internet about these type of antennas: from those maintaining it doesn’t and can’t work, to those that swear by it. The truth is they do have their problems and one needs to be aware of them. Common mode currents is the big issue. I got rid of most of the noise by installing a 2″ round toroid choke at the feed point. Wound 15 or so turns of RG58 around it. That quietened things way down. Allowed me to stop using the attenuator to reduce the noise and got rid of the AM broadcast bleed over in AM mode. One website recommended a counterpoise of 0.05 wavelength. That comes to 1m for the 20m band so I need to play more with that to see what changes it actually makes.
I might also ground it at the Un-Un seeing it has a ground/radial lug and see what that does.
Another advantage is that it is resonant at any frequency that is a multiple of a half wave. So the 20m version should show resonance somewhere in 10m which it does. Unfortunately; just over 29mhz which ties in with the measured resonance at 14.6mhz.
So with a bit more work I should have a dual band no tune vertical.
Which has go me thinking…Spider beam do have an 18m push up telescopic pole advertised on their website. That is pretty well a half wave on 40m! Soo..40, 20 and 10m on one pole. I think I can do that. Just need to make a suitable mounting point against the house that I could strap the bottom section of a 60′ of tapered fibreglass pole to. A length of 6″ x 3″ treated pine should be enough.
Took it for a spin in the car yesterday and gave it a good trashing on 20m on the ANZA Net. The Xiegu G90 was set for 10w SSB and the selector on the KL505V was on 6. The Average power meter reading was 150w to about 175 out. Depending on how loud I spoke. The Fans come on slowly the moment the amp is turned on and ramp up when the amp is keyed. Nice feature. The amplifier ran smoothly and got warm to the touch but no more. The voltage from the car battery stationary was about 12.4 volts and starting the car did not change the output level in any noticeable way.
AM test 5w carrier in 50w out, 10w AM in 100w carrier out. No worries there!
My 10w PEP input obviously was causing no issues and all audio reports were good.
So far so good. It works as it should and the fans do their job. A solid little amp for the job as usual. But remember: it has no shutdown circuitry or filters so try not to run it flat out cos if something goes wrong after the amp and you have no headroom, the amp will not shutdown till it breaks. I ran an in line swr meter after the amp and kept an eye on it.
I am talking average power with 10w SSB in. A whistle pegged the 200w meter.
I don’t think there is anything else out there for the price.


![20200117_091649[1]](https://dd182003.files.wordpress.com/2020/01/20200117_0916491.jpg)
![20200117_091723[1]](https://dd182003.files.wordpress.com/2020/01/20200117_0917231.jpg)
![20200117_113612[1]](https://dd182003.files.wordpress.com/2020/01/20200117_1136121.jpg)
![20200117_113716[1]](https://dd182003.files.wordpress.com/2020/01/20200117_1137161.jpg)
![20200118_164312[1]](https://dd182003.files.wordpress.com/2020/01/20200118_1643121.jpg)
